TABLE OF CONTENTS
Quick Start
Watch these videos to get up and running quickly with Replay Media Catcher:
Overview
Replay Media Catcher 5 is an easy, yet powerful way to capture video and audio files from thousands of web sites as they play in any web browser. These files can be transferred to phones or tablets, burned to a CD or DVD disc, or incorporated into other programs like PowerPoint or video editors.
Besides being a simple-to-use streaming media recorder, Replay Media Catcher 5 has some other handy features:
- Automatically converts recorded files to a format of your choice.
- Records audio from ANY source as it plays on your PC.
- Lets you schedule recordings from any playable URL at a time you choose.
- Has embedded video, music and radio guides to help you find interesting media.
- Uses a Music Fingerprinting technology to automatically identify and tag recorded music MP3 files.
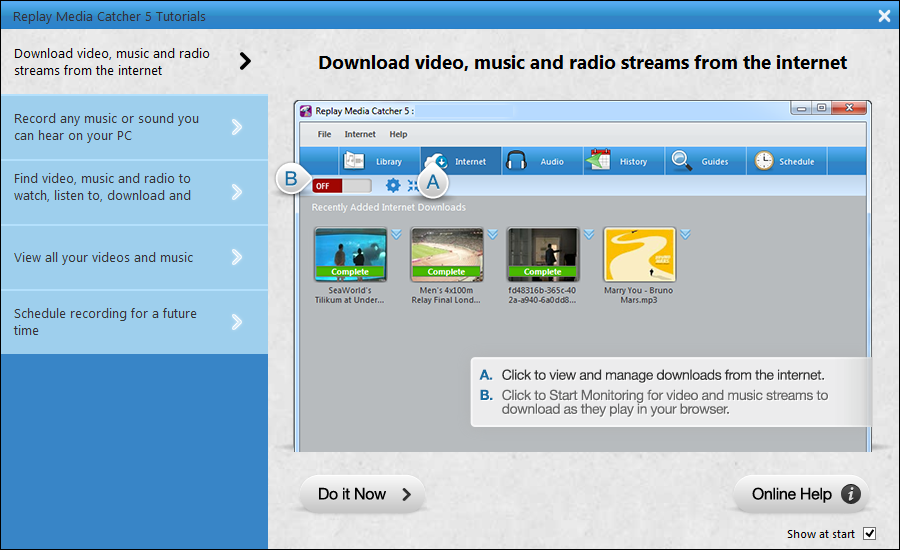
Tutorials
Replay Media Catcher includes handy tutorials that provide a graphical overview of how to perform most tasks.
You can open the tutorial screen at anytime via the Help > Tutorials menu.
Library: Organizing your Downloaded Video, Music and Radio
When you start Replay Media Catcher 5 for the first time, the default view is the Library.
The Library displays all audio and video that you have downloaded or recorded.
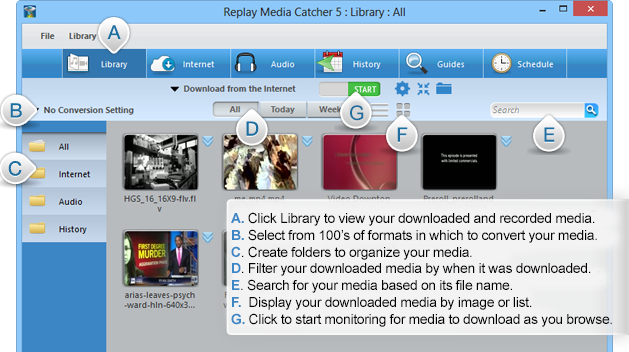
The Library has two types of views: list view and thumbnail view. To change views, select the one you want from the toolbar. See letter F in the screenshot above.
Thumbnail View
The thumbnail view displays an icon for each download or recording. You can change the icon image in the item's Properties if you like.
The context menu button in the top right corner of each thumbnail displays action menu items that apply to that item. This menu can also be displayed by right clicking the item.
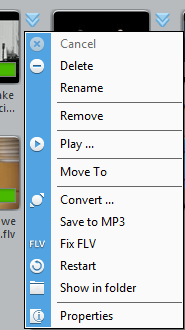
Double clicking an item will play it. If there is a progress bar across the item, double clicking the progress bar will display the Properties dialog.
Renaming an item is similar to renaming a file in Windows Explorer: To rename an item, click the name text once. Use the Escape key to cancel or Return key to confirm.
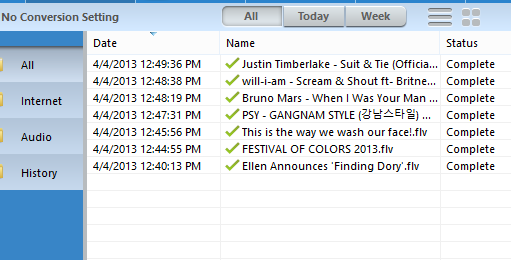
List View
The list view displays a row for each item with columns containing the date, name and status of the item. It also displays an icon indicating the status.
To display the context menu for an item select the item and right-click. You can do this with several items at once.
Folders
There is a folder for each module that contains downloads and recordings for that particular module.
You can create your own folders via Library > Folders > New Folder in the Library menu.
Each module also has a default output folder and you can change this using the toolbar icon on the appropriate module.
You can drag both thumbnail and list view items to folders you create.
You can show or hide the folders via Library > Folders > Show folders in the Library menu.
You can import items into your library by drag and dropping them from Windows Explorer. The items will be moved into your Replay Media Catcher Media Folder. When viewing a folder you have created you can import all media in that folder by Library > Folders > Synchronize.
Library Settings
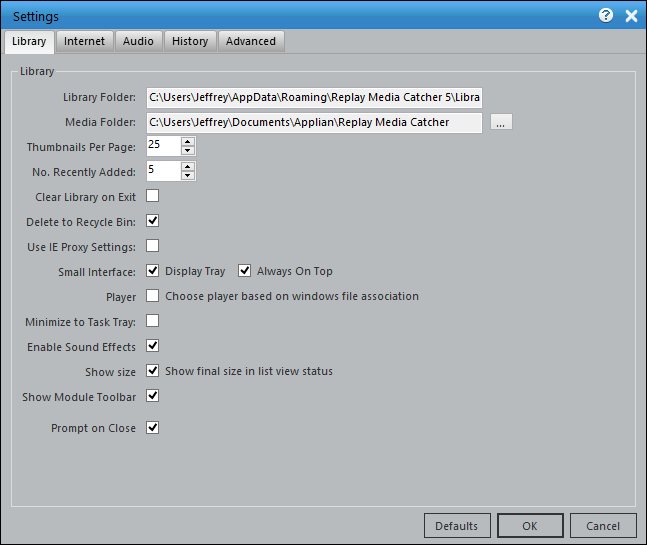
The Library > Settings menu will display the Settings dialog and automatically display the Library tab. You can change the following settings:
- Media Folder: This is the root folder where your media will reside.
- Thumbnails Per Page: The number of thumbnails that appear in the Library after which a "More" icon will appear.
- No. Recently Added: The number of items that will appear in the Recently Added view of each module after which a "More" icon will appear. Clicking this icon will display the next page of items.
- Clear Library on Exit: When checked, this will clear the library of all media when the application is exited. No media files will be deleted.
- Delete to Recycle Bin: When checked, deleting an item will move it to the recycle bin. Unchecked and the file will be deleted.
- Use IE Proxy settings: When checked, Replay Media Catcher will use Internet Explorer's proxy settings.
- Small Interface/Display Tray: When checked, and using a module's small interface, in-progress downloads and recordings will be displayed in a small panel just above the task tray
- Small Interface/Always on Top: When checked, and using a module's small interface, the small interface will be the top-most window.
- Player/Choose based on Windows file association: When checked the player associated with the items file extensions will be used. When unchecked the Applian Media Player will be used. If it is not installed you will be prompted to download and install it.
- Minimize to task tray: When checked, and the application window is minimized, it will appear in the task tray and not the task bar.
- Enable Sound Effects: When checked, a tone will sound when recording is turned on or off.
- Show Size: When checked, the final recording size will be listed next to its Status.
- Show Module Toolbar: Toggles on/off the quick-access recording toolbar. If clicked off, recording can still be done via the Internet and Audio tabs in the main interface.
- Prompt on Close: Display a warning message if there are active streaming connections when RMC5 is closing.
To reset to the default settings. Click the Defaults button.
Conversions
The Library module contains a drop down list of preset conversion settings in the toolbar. Selecting a preset from this drop down means that any download, recording or conversion started after the preset is changed will be converted to that format. If you don't wish for a conversion to occur, select Don't Convert.
To automatically import recorded, downloaded and converted media into iTunes, select an iTunes supported conversion settings and check the Import into iTunes item at the bottom of this menu. We recommend that you have iTunes setup to copy media files to its library when adding (found in the Preferences -> Advanced tab of iTunes).
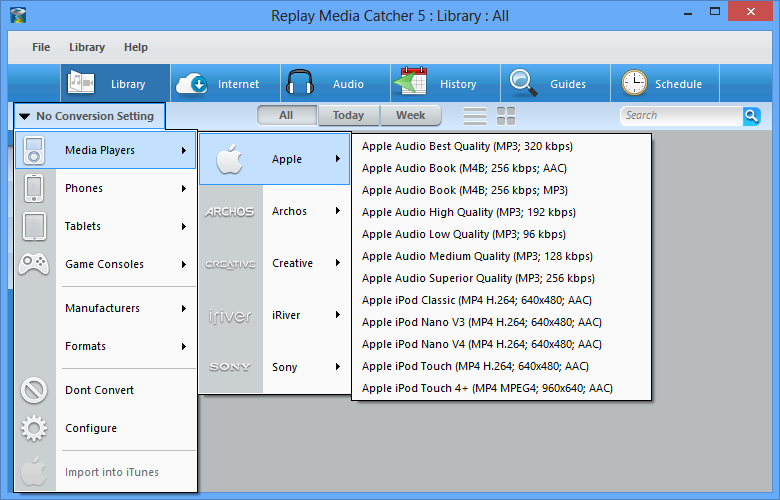
You have full control over the preset conversion settings and can create, delete and modify them. However as new devices and formats are released, preset conversion settings will be updated, and these are automatically downloaded when you start the application.
To create, delete or edit existing preset conversion settings select the Configure menu item from the drop-down or use the Library > Conversions Settings menu item. The Conversion Settings dialog will appear.
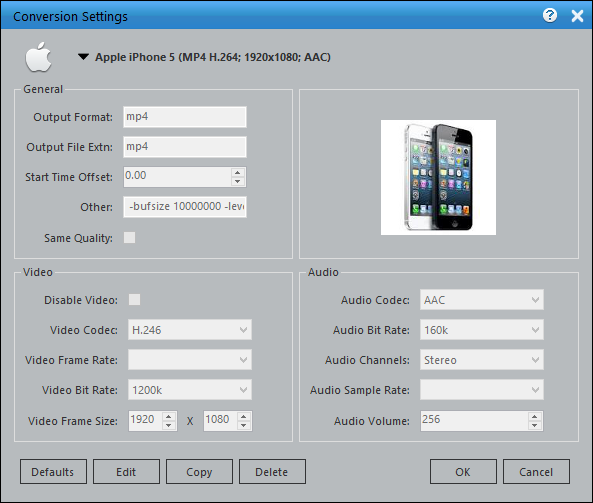
- Select the preset conversion setting you wish to modify from the drop-down list.
- Edit button: Will enable editing of the existing preset.
- Copy button: Will prompt you for a new preset name and create that preset.
- Delete button: Will delete the preset.
- Defaults button: Will reset all presets to their default settings.
To add a new format without deleting the default, simply click the copy button first, give your new format a name, then edit as you wish.
Tools: Convert
The Library > Convert menu allows you to select one or more media files from your file system to convert. These files can be outside of your library and will be imported if required.
Tools: Fix FLV
The Library > Fix FLV menu allows you to select one or more FLV files from your file system to fix. Use this if a downloaded file is unplayable or gives an error in your media player.
Tools: Meta Data/Tags
The Library > Meta Data/Tags menu allows you to select one or more media files from your file system so you can change the ID3 tags. Double-click a tag to change the value.
Properties
On each item's menu is a Properties option, accessed by right-clicking on an item or via the Library > Properties menu item:
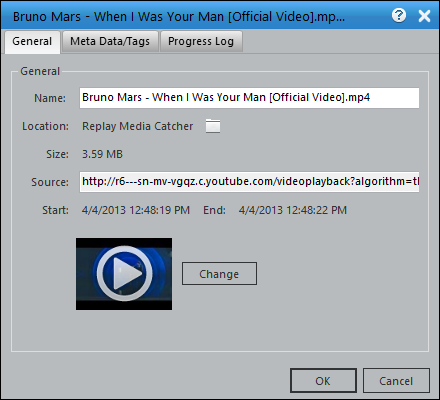
- General Tab: Displays information such as Name, Location, Size, Source and Image. You can change the name and image. To view the file in Windows Explorer click the folder icon next to location.
- Meta Data/Tags: Displays and allows the modification of ID3 tags if the format supports it. If supported, double-click a tag to change its value. For MP3 files, the Lookup button can be used to automatically populate the tags.
- Progress Log: Displays information about the download, recording or conversion. If a download, recording or conversion has failed then look at this log to see the cause.
Internet: Downloading and Recording Video and Audio from your Browser
Replay Media Catcher 5 will detect and download video and music from thousands of sites and streamed via many different protocols and in many different formats.
Click here for the full list of supported protocols.
Browser Independence
It does not matter what browser or other application (including in the applications guide) that you use to watch video or listen to music that is streamed from the internet. This is because Replay Media Catcher monitors the network stream for media, and once detected will download or record the stream.
What is the Difference Between Recording and Downloading Internet Streams?
When Replay Media Catcher detects a compatible stream it will try and create another connection to download it. When Replay Media Catcher is downloading there is no need to continue to play the video or music in your browser!
Sometimes it is not possible for Replay Media Catcher to download. In these instances, Replay Media Catcher will record the stream as it plays in your browser. When Replay Media Catcher is recording in this manner you must continue to play the video or music in your browser. If you stop playback, then Replay Media Catcher will also stop recording.
Replay Media Catcher displays Downloading or Recording in front of each stream's progress bar.
Monitoring For Internet Streams
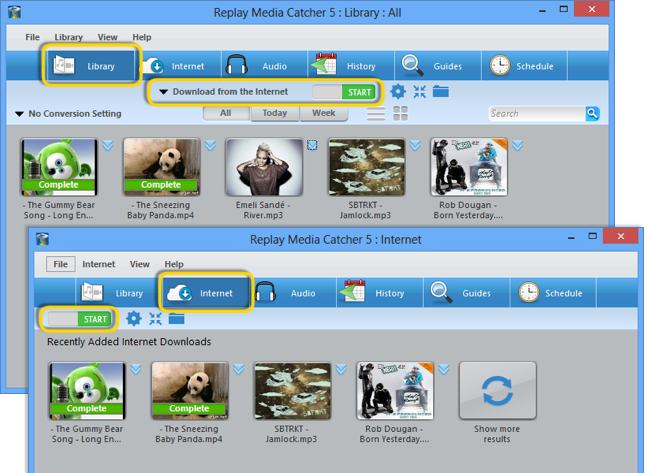
You must start monitoring BEFORE you watch or listen to media that you want to capture. Click on the green START switch before browsing to the media you want to capture. Once clicked, the START switch will turn red and say STOP, but will be actively monitoring for media. The START switch can be accessed via the Library or Internet tab views. In the Library tab view, make sure Download from the Internet is selected in the pulldown.
Small Interface
If you are capturing a lot of media from the internet (say a playlist of songs) then you may wish to use the Small Interface by clicking  in the toolbar. The main interface will disappear and the Small Interface will appear in the top right hand corner of your screen. The Small interface can be dragged to different locations, and you can return to the Main Interface by clicking .
When you switch to the Small Interface, Replay Media Catcher will appear on your screen like this:

Setting the Output Folder
At any time you can change the default output folder where recordings and downloads will be saved by clicking  in the toolbar.
Internet Settings
The Internet > Settings menu will display the Settings dialog and automatically display the Internet tab. You can change the following settings:
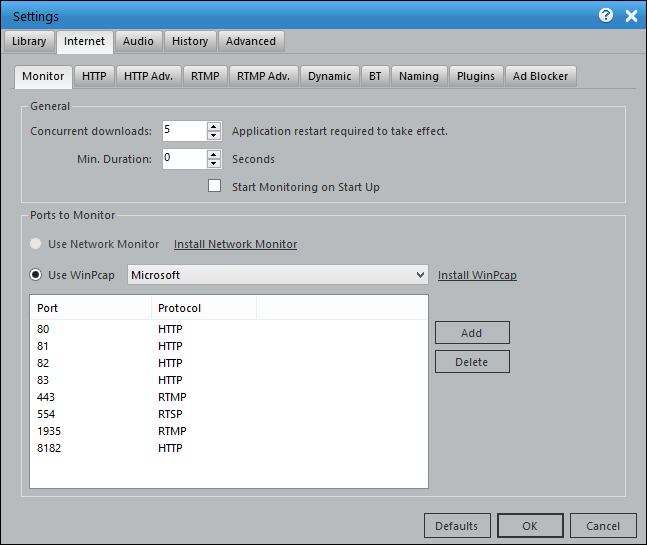
- Monitor
- Select from the Applian Network Monitor or Winpcap as the network driver. Use the Network Monitor if you are capturing over a VPN or Proxy or having trouble with WinPcap. Otherwise, WinPcap is the preferred driver.
- Enter ports to be monitored and their expected protocols.
- Select Start Monitoring on Start Up if you wish Replay Media Catcher to automatically begin monitoring when the application is launched.
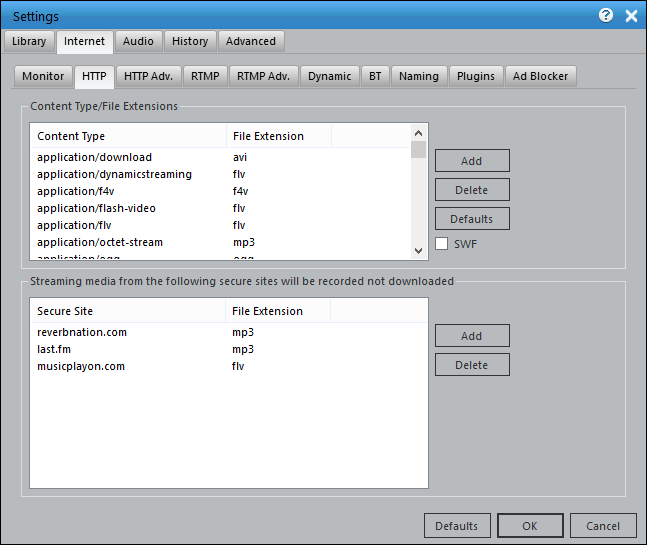
- HTTP
- Audio and video streamed over the HTTP protocol is identified by the content-type. You can add and remove content-types and the associated file extensions.
- You can quickly add or remove the detection of SWF files by checking/unchecking the SWF check box.
- Some sites do not allow multiple connections to them or use URL s that are valid only the first time they are used (by your browser). We refer to them as secure sites. Media Recorder can automatically record instead of downloading secure sites. Add the URLs for secure sites here.
Click here for information on the HTTP Protocol
- HTTP Adv.
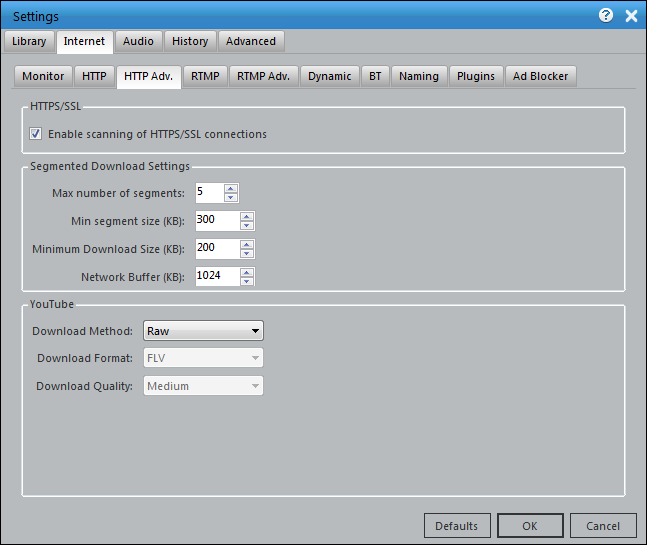
HTTPS/SSL
- Enable scanning of HTTPS/SSL connections: RMC5 will actively look for HTTPS data which might contain streaming media. For proper function, a certificate from Replay Media 5 SSL Scanner Root needs to be installed. If you wish to record streaming media from websites using HTTPS, you will need to install the certificate.
Segmented Download Settings
- To increase the speed of HTTP downloads, Replay Media Catcher can use a method called segmented downloading. This is where a single download is broken to several smaller downloads (segments) and each is downloaded at the same time.
- The speed boost obtained is dependent on your network connection, your computer and the server streaming the video or audio.
- Here you can configure the number of segments to for each download, and the minimum size for each segment.
- If a download is failing and you see in the Progress log that segments are failing, change the Max number of segments to 1.
YouTube: Replay Media Catcher can capture from YouTube in a variety of ways. These settings allow you specify which way you wish to detect and capture. Remember that you can always download any available YouTube format/quality using the built in YouTube guide.
- Download Method:
- Raw. Detects and downloads media streams from YouTube based on the content-type. As of June 2013, this is the preferred method of downloading from YouTube, resulting in MP4 files.
- Generate. Detects and downloads media from YouTube. Will normally always result in an 640x360 FLV being captured.
- Page. Detects and downloads media from YouTube. The format and quality downloaded will depend on the Format and Quality you select below. Not all YouTube videos are compatible in Page mode.
- Download Format. Only enabled when method Page is selected.
- Download Quality. Only enabled when method Page is selected.
- RTMP
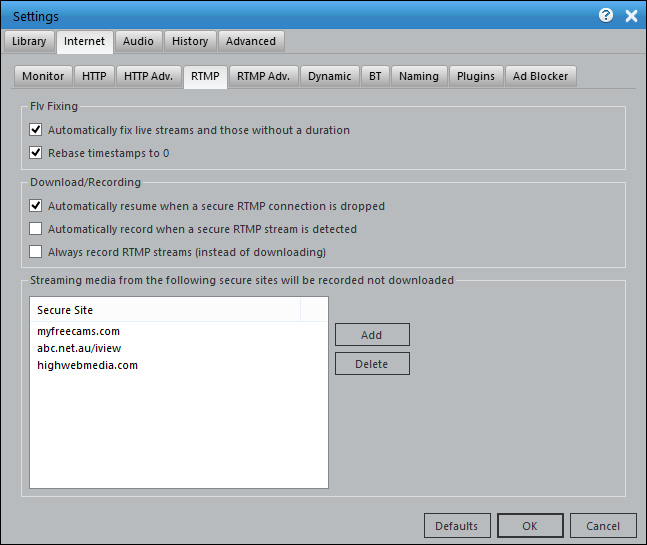
Live FLV streams such as webcams sometimes send incorrect timestamps. This means the file created for the download plays back incorrectly. The following settings allow you to control how these are fixed.
- Automatically fix live streams and those without a duration: Enable this and such streams will be fixed.
- Rebase timestamps to 0: Enable this and all timestamps will be rebased so the file starts at 0 time.
Some sites that stream RTMP will also try and secure it with a technology called SWF Verification. It is illegal for our products to respond to SWF Verification requests so we ignore them. This will cause the server connection to then drop after a period of time. The following settings allow you to control how these secure streams are handled.
- Automatically resume when a secure RTMP connection is dropped: Enable this and the download will automatically restart each time the connection is dropped.
- Automatically record when a secure RTMP stream is detected: Enable this and the application will automatically record the stream, instead of attempting to download it
- Always record RTMP streams (instead of downloading): Enable this and the application will always record RTMP streams.
Some sites use protection technologies (including SWF Verification and other site specific technologies) that mean it is only possible to record. Replay Media Catcher can automatically record instead of downloading secure sites. Add the URLs for secure sites here.
Click for information on the RTMP Protocol
- RTMP Adv.
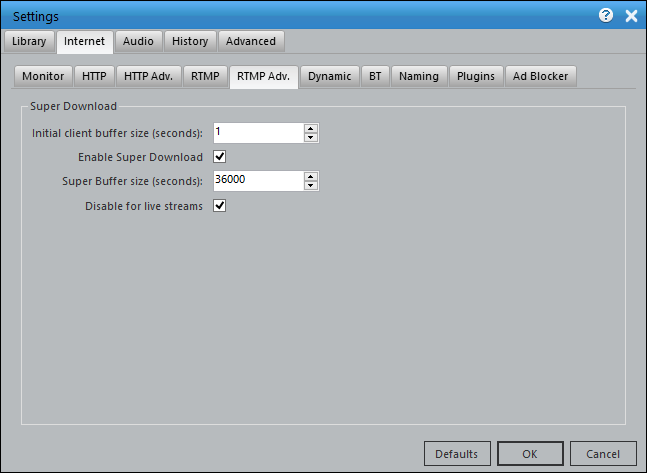
The RTMP protocol allows us to request the amount of data the server should send in each chunk. Requesting a large chunk means that in many instances the download will happen much faster than the playback speed. The following settings allow you to control how this Super Download feature works.
- Initial client buffer size (seconds): The number of seconds of data the server should send.
- Enable Super Download: Check to enable this feature.
- Super Buffer size (seconds): The number of seconds of data the server should send when attempting a Super Download.
- Disable for live streams: Check this to disable this feature for live streams.
- Dynamic
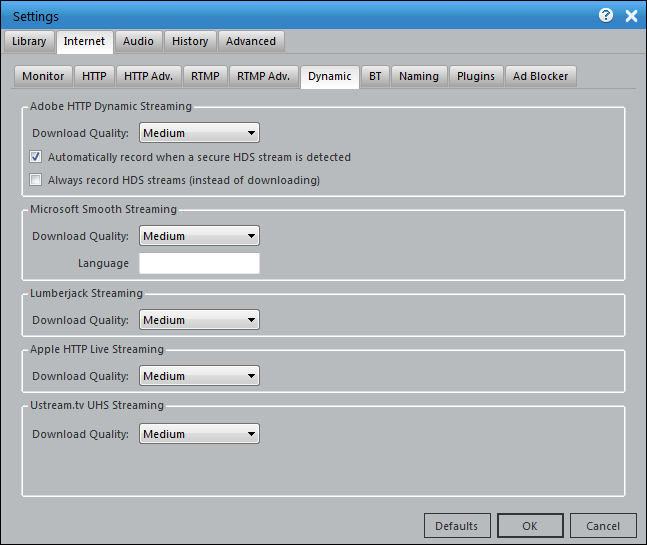
Adobe HTTP Dynamic Streaming
- Adobe HDS is an adaptive streaming protocol which means that the quality of the media displayed changes based upon your internet connection.
- There are many different stream qualities available. Select the quality you wish to download from the drop-down list.
- You can additionally choose to record rather than download HDS streams. The video will need to play to completion in your browser.
Smooth (Click here for information on the Smooth Streaming protocol)
- Microsoft Smooth Streaming is an adaptive streaming protocol which means that the quality of the media displayed changes in real time as you watch, based upon your internet connection.
- There are many different stream qualities available. Select the quality you wish to download from the drop-down list.
- When multiple language tracks are available, you can enter that here to grab a specific track. Since there is no naming convention, you will need to examine a manifest file to see which language options are available.
HDS (Click here for information on the HDS protocol)
- Adobe HTTP Adaptive Streaming is an adaptive streaming protocol which means that the quality of the media displayed changes in real time as you watch, based upon your internet connection.
- There are many different stream qualities available. Select the quality you wish to download from the drop-down list.
Lumberjack (Click here for information on the Lumberjack protocol)
- Lumberjack Adaptive Streaming is an adaptive streaming protocol which means that the quality of the media displayed changes based upon your internet connection.
- There are many different stream qualities available. Select the quality you wish to download from the drop-down list.
Ustream.tv UHS Streaming
- This streaming format is primarily found at ustream.tv, but some other sites use it as well.
- Select the quality you wish to download from the drop-down list (for when multiple qualities are available).
- BT (P2P Torrent)
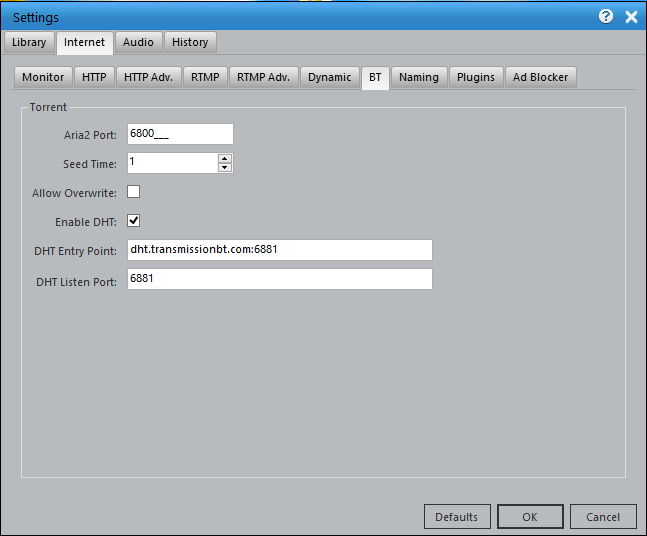
Replay Media Catcher's torrent and magnet link downloader (based upon Aria2) is controlled via the following settings.
- Aria2 Port: The port that aria2 will listen on
- Seed Time: The number of minutes after a download is complete that it will seed for.
- Allow Overwrite: If checked then any existing file will be overridden
- Enable DHT: Check to enable distributed hash table lookups
- DHT Entry Point: Sets the host and port as an entry point to IPv4 DHT network.
- DHT Listen Port: Sets the UDP listening port used by DHT(IPv4, IPv6) and UDP tracker. Multiple ports can be specified by using comas - for example: 6881,6885. You can also use hyphens to specify a range - for example: 6881-6999. Commas and hyphens can be used together.
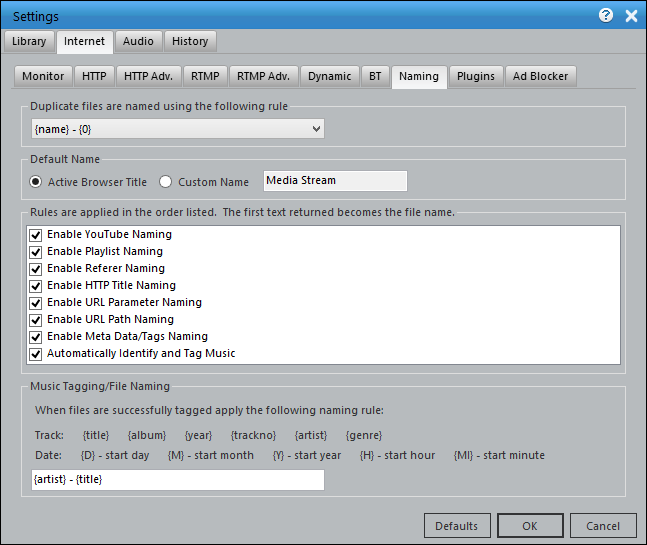
- Naming
Video and audio files are automatically named by Replay Media Catcher, Naming rules are applied when a stream is detected:
- Active Browser: If a browser window is active then the title of that page will be used. Supports Internet Explorer, Chrome, Firefox, and Opera.
- YouTube: The last visited YouTube page title will be used for a YouTube download
- Playlist: Video and music players sometimes use "playlist files" to obtain the stream(s) to play, and these can contain title information. Replay Media Catcher will match stream URL s against any detected playlists to see if a title can be found. This is common for music sites (e.g. Pandora)
- Referer: HTTP requests can contain what is termed a referer which identifies the URL of the page which made the request. If the detected streams request contains a referer then the title of this page will be used as the name.
- HTTP Title: The application keeps track of all visited HTML pages. The domain name of a stream's URL will be used to look up the last page visited in that domain and that page title will be used. Extended HTTP Title lookup will occur once the download is complete.
- URL Parameter: The stream's URL is searched for parameters such as title= or name=. If one is found then that will be used as the name. Extended HTTP Title lookup will occur once the download is complete.
- URL Path: The file part of the stream's URL will be used. For example http://www.applian.com/some/path/file.mp3 the name would be file.mp3. Extended HTTP Title lookup will occur once the download is complete.
The following Naming Rules are applied when a stream has completed downloading:
- Meta Data/Tagging: The resultant file will be examined for ID3 tags. Applies to file types that support IDS tags (MP3, MP4, WMV, etc) - not FLV.
- Identify and Tag: Audio fingerprinting is used to identify and tag MP3 files.
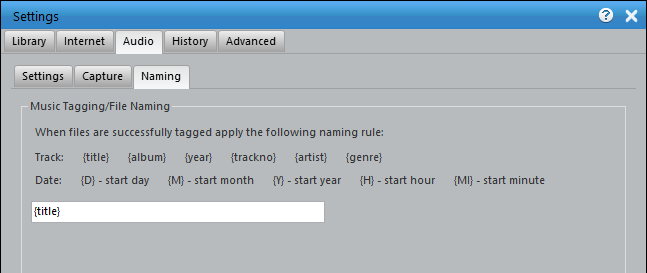
Music Tagging/File Naming: After the metadata of a music file has been identified, the filename can be changed according to the stated rules.
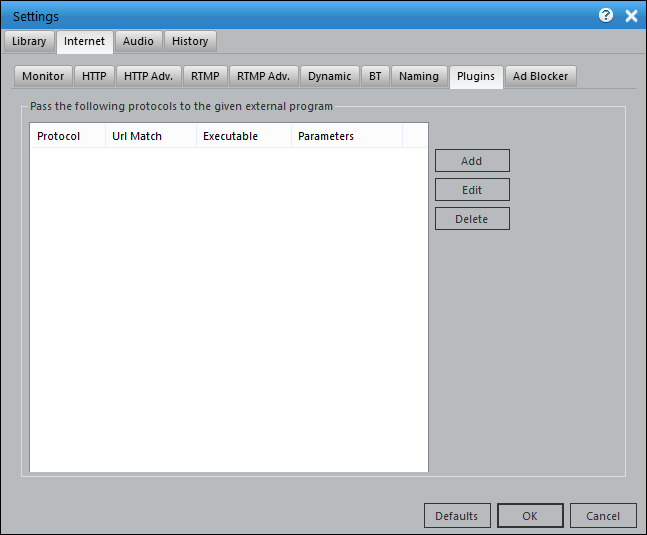
- Plugins
Replay Media Catcher supports adding third party plug-ins like rtmpdump to handle the downloading of streams. If Replay Media Catcher cannot download or record a file, installing a plug-in will give it extended power.
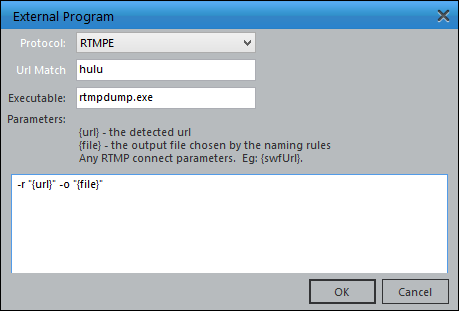
- Click the Add button to bring up the External Program dialog.
- Select the protocol you would like to pass to the plug-in.
- Enter part of the URL to match.
- Enter the plug-in's executable name and place the executable in the Replay Media Catcher installation folder.
- Enter the executable's parameters. Use the patterns URL and file as indicated on the dialog. Other parameters should be hard coded.
- Click OK to save
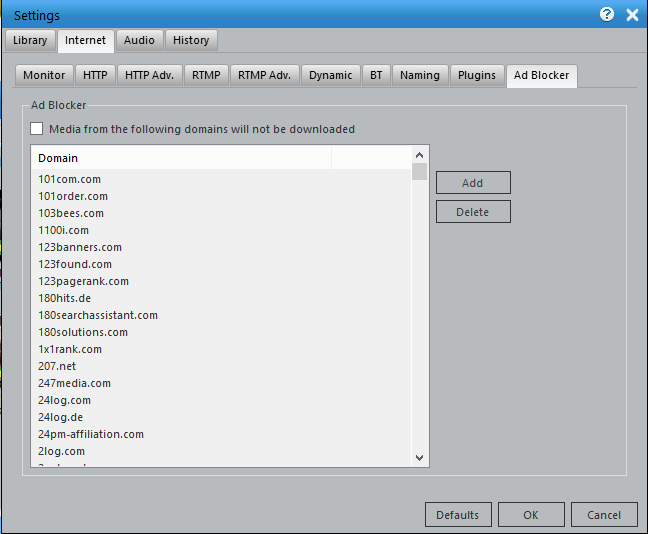
- Ad Blocker
Downloading ads can be annoying. Enable Ad blocking and video ads from the list of domains in the Ad Blocker will not be downloaded.
Tools: Manual Download
You can perform manual downloads using the Internet > Manual Download menu.
The dialog lets you select the type of download to perform.
- Normal: A normal HTTP download will be performed from the given URL .
- RSS Feed: Enter the URL of an RSS feed containing media and select the publication date after which all media in the RSS feed will be downloaded.
- YouTube Channel: Enter the URL of a YouTube channel and select the publication date after which all videos in the channel will be downloaded. The highest resolution video of each item in the channel will be downloaded.
- YouTube Page: Enter the URL of a YouTube page. The highest resolution video will be downloaded.
- YouTube Playlist: Enter the ID of a YouTube playlist. The highest resolution video of each item in the playlist will be downloaded.
Audio: Recording What You're Hearing
Audio recording is a great way to capture music when downloading fails. Saving audio using this method is guaranteed to work, regardless of the format, protocol or web site of the media.
When Replay Media Catcher detects that downloading will fail during audio/video playback, it will prompt you to use the built in audio recorder.
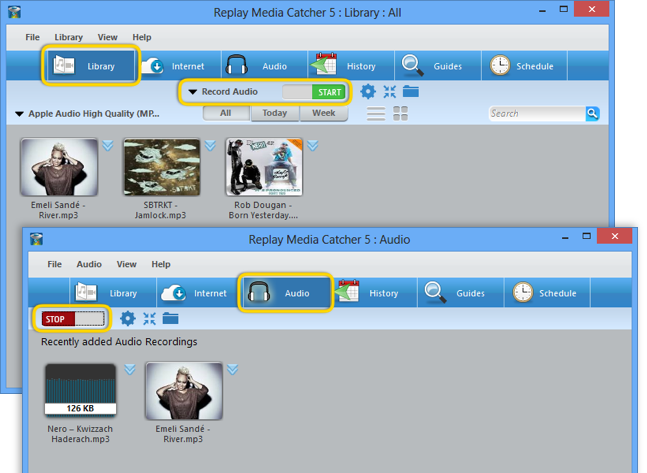
Start recording by going to the Internet tab or Audio tab, and clicking the green START button. In the Library tab view, make sure Record Audio is selected in the pulldown. Once clicked, the START switch will turn red and say STOP, but will be actively monitoring for audio media. The Audio tab module will glow blue while recording.
Small Interface
If you are capturing a lot of media from the internet (say a playlist of songs) then you may wish to use the Small Interface by clicking in the toolbar. The main interface will disappear and the Small Interface will appear in the top right hand corner of your screen. The Small interface can be dragged to different locations, and you can return to the Main Interface by clicking .
When you switch to the Small Interface, Replay Media Catcher will appear on your screen like this:
Setting the Output Folder
At any time you can change the default output folder that files are saved in by clicking in the toolbar.
Audio Settings
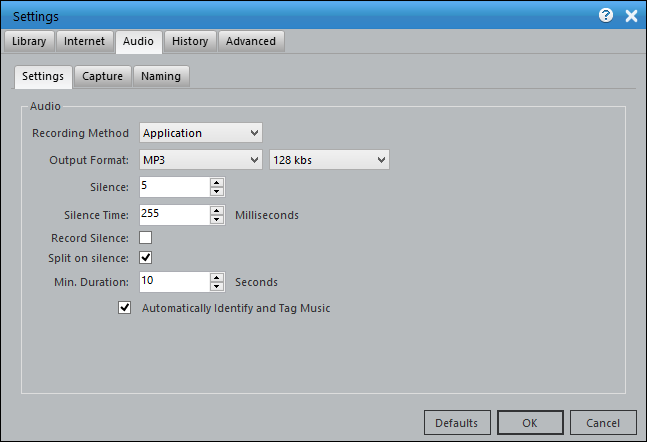
The Audio > Settings menu will display the Settings dialog and automatically display the Audio tab. You can change the following settings:
- Recording Method: Either Application or Device. If Application, audio will be pulled out of running applications which are on the Capture list. If Device, audio will be recorded from the selected recording device, such as Line In or Microphone.
- Output Format: Either MP3 or WAV. If you choose MP3 you can also select the output rate.
- Silence: Is a value between 1 and 255. Sound values at or below this number will be considered silence
- Silence Time: The number of milliseconds that sound values should be below the Silence value for silence to be detected
- Record Silence: Silence based on the parameters above will be recorded when this is checked. When unchecked silence is not recorded.
- Split on Silence: The current recording file is closed and a new one opened when silence is detected based on the parameters above.
- Minimum duration: Recordings less than this value are automatically deleted. This can be used to remove ads.
- Automatically Identify and Tag Music: A Rovi lookup will be performed to find metadata for the recorded audio, if applicable.
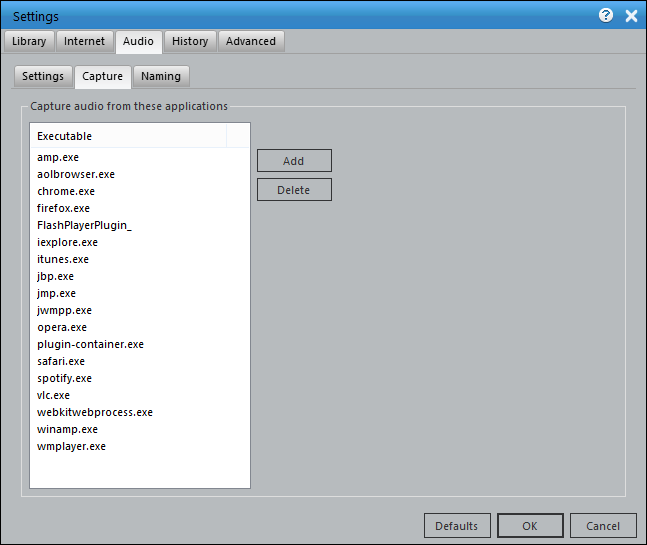
Audio Settings: Capture Tab
- Add or remove programs from which audio should be directly captured.
Audio Settings: Naming Tab
- Recordings will be named according to given rules.
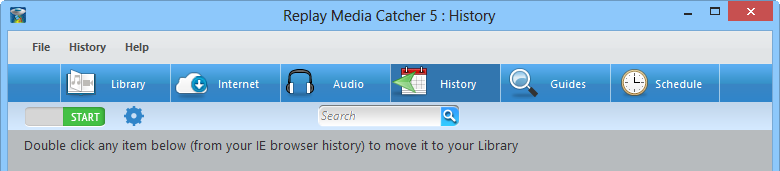
History: Extracting Media From Your Browser Cache
The History module monitors the Adobe Flash player running in your browser and also the caches of Internet Explorer, Firefox and Chrome. It is the only way to be able to capture videos that are streamed over HTTPS (SSL).
The History tool works best when used in conjunction with Internet Explorer.
- Start monitoring by clicking the Start button in the toolbar. The History module will glow blue when monitoring.
- Play the video in your browser. It may take a little while before the browser decides to cache it and it appears.
- Once complete click the item to move it from the history to your library.
History Settings
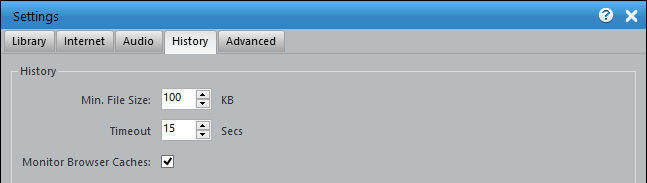
The History > Settings menu will display the Settings dialog and automatically display the History tab. You can change the following settings:
- Minimum File Size: Cached files under this size will not be displayed.
- Timeout: If no data is written to the cache for this time then the file is considered complete.
- Monitor Browser Caches: When checked, Replay Media Catcher monitors the browsers cache as well as the flash player. This may result in the same file being shown twice: Once from the cache and the other from the flash player.
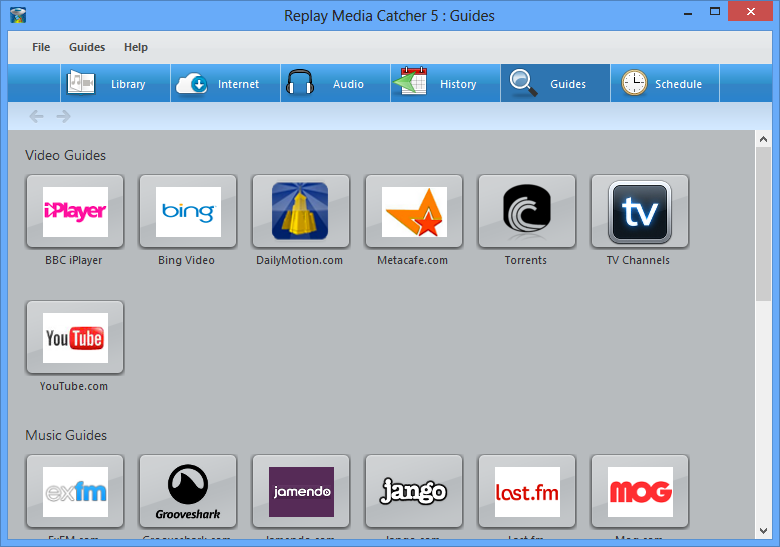
Guides: Exploring the Media Guides
Various Guides are available to help you find Music, Video, Radio, Podcasts and Audio Books to download and record. We are adding new guides all the time so be sure to always use the latest version of Replay Media Catcher.
Some guides provide the ability to download and schedule downloads directly from within the guide itself. Others require Internet monitoring or audio recording to be switched on to capture media as it plays in the guide.
When you open a guide you may be prompted for the best method to download or record from that guide. If you are not prompted then the guide will allow you to directly download from within it.
Guides that allow direct downloads can have content scheduled for download or recording. Using the guide for Scheduling ensures correct information is entered into the scheduler.
Schedule Recording
Replay Media Catcher contains a sophisticated scheduler, which allows you to schedule regular and unattended downloads and/or recordings. The scheduler takes into consideration the time zone of the source, and also handles changes in daylight savings between the source and you. This is particularly important for regular radio recordings.
Replay Media Catcher does not need to be running when a download or recording is scheduled. It will automatically start.
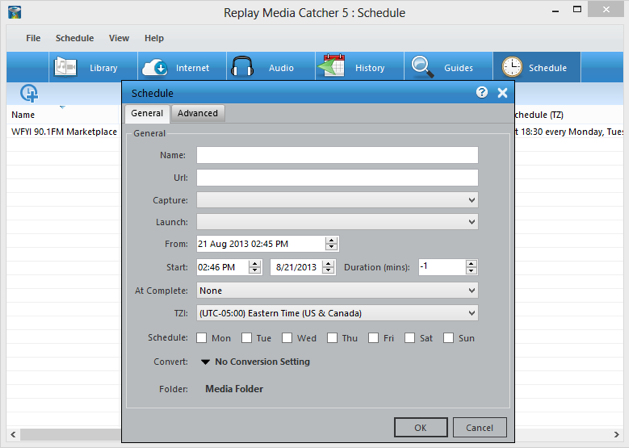
You can configure a scheduled download or recording as follows:
- General
- Name: This is the name of the scheduled recording/download. You can also use the following parameters to add start time information to the file name: {D} - day, {M} - Month, {Y} - year, {H} - Hour, {MI} - minute.
- Url: The URL.
- Capture:
- Direct download: The URL will be downloaded directly
- Record from stream: Internet monitoring will be switched on and the URL will be opened in the default browser. Whatever is streamed will be captured.
- Audio Record (Application): Audio recording will be switched on and the URL will be opened in the default browser. Whatever is streamed will be captured.
- Audio Record (Device): Audio recording will be switched on for content from external device such as Line In or Microphone. Consult Settings->Audio for selecting the device.
- Launch/Download: Changes based on the capture selection. Defines how the URL will be started or defines the download method to use for the URL.
- From: Is enabled for downloads such as RSS Feed, BBC Episode and YouTube channels which have published dates. Items with published dates after this date will be downloaded. Each time the schedule runs for such downloads this date will be updated ensuring only newly published items are downloaded.
- Start: The start time in the given time zone.
- Mute Volume: Mute the computer during recording time.
- At Complete: Choose the behavior of Replay Media Catcher when the scheduled item has completed recording:
- None: Take no additional action.
- Stop monitoring for downloads: Turn off monitoring so that additional data is not recorded.
- Close: Quit Replay Media Catcher.
- Duration: The duration of the recording after which time it will be stopped. -1 means unlimited duration.
TZI: Time zone of the start time. This will be used to schedule the download at the correct time on your machine. Each time a scheduled download occurs, the start time is updated against the time zone to take into account daylight savings changes or your machine and this time zone.
- Schedule: The days of the week on which the scheduled download will run.
- Convert: Select a preset conversion setting once the download is complete.
- Folder: The folder within your media folder where the download will be saved.
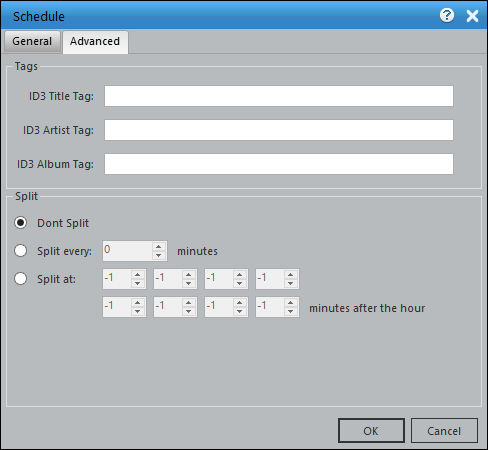
- Advanced
- Tags: Use the ID3 Title, Artist, and Album Tag fields to manually set these values for recordings. The ID3 Title Tag field also supports the {D} - day, {M} - Month, {Y} - year, {H} - Hour, {MI} - minute shorthand for adding a timestamp to your recording.
- Split: Choose time points to split the recording at.
- Don't Split: A single recorded file will be created over the duration.
- Split every: X minutes: At given interval, the recording will stop and a new recording of the stream will begin.
- Split at: X minutes after the hour: Split recording at given time points. "-1" is a placeholder and no split will occur.
We recommend that where possible always use the Schedule menu from within a Guide. This will ensure times and time zones are set correctly for the source.
Converting
Please refer to the Conversions topic in the Library section of this guide.
Customizing the Interface
Some Replay Media Catcher customers prefer to see all the features available in the main interface. Some customers prefer a minimalist interface. You can customize the interface to your liking by showing/hiding the tabs, library folders, and thumbnails.
- Tabs: The various tabs can be shown or hidden using the View menu. The Show Tabs option will turn on/off all tabs, while individual tabs can also be turned on/off. We recommend being in the Library tab view before hiding all tabs.
- Library folders: The Library/Media folders on the left side of the interface can be shown/hidden from the Library->Folders menu, Show Folders option. The New Folder option will create a new folder in your Media folder (see Library Settings).
- Thumbnail/List view: As previously mentioned, recorded and downloaded files can be viewed as graphical thumbnails or in an ordered list.
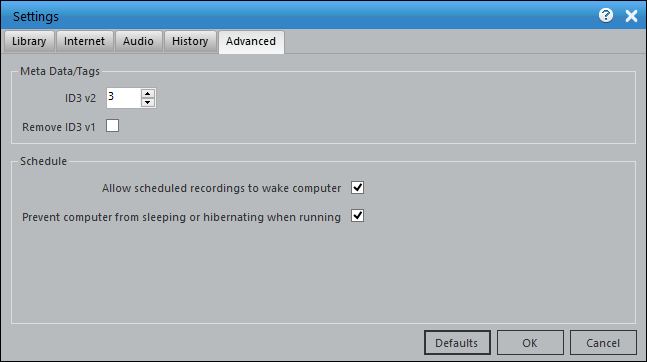
Advanced Settings
- Meta Data/Tags: The metadata (album, artist, date, ...) tagging version can be chosen. Depending on the version of Windows, the operating system might not show tagging information although it is embedded into the files. If you find this to be the case, decrease the ID3v2 subversion number to 2 or 1. Modern music library software such as iTunes will still show the appropriate song information.
- Schedule: You can have Replay Media Catcher 5 wake your computer for scheduled recordings as well as prevent the computer from sleeping so that you do not miss a recording.
- Process New Streams: By default, this is enabled because you want RMC to continuously be watching for new streaming media from any particular page. The usefulness of the option comes when recording RTMP streams (which requires a browser window to be left open) and you want to continue browsing in a different window without picking up new content. The Process New Streams option can be turned off/on when the Internet tab is selected in the interface, via the Internet menu option.
